
Searching in Word: a possible language

by Emilio Lara, IT Dept.
Today, my post deals with an extremely useful tool: the well known Find and Replace option in Microsoft Word. A priori, it seems to be a quite basic tool; however, it involves more complexity that it firstly seems and it can help us to save many hours of repetitive work.
This tool is mainly used for two issues:
– Finding a certain string throughout the document,
– Automating a search order for an X string in order to replace it for a Y string throughout the whole document or in a part of it.
So, just imagine you have a 250,000 words file and your customer asked you to put the word ‘house’ in red every time it appears in the document. It would be a long and never-ending process if it were not for the option Find and Replace. The task of searching, identifying and replacing these terms could take even some days if we had to do it manually but, by contrast, it can be made in just some seconds. The procedure would be as follows:
– Click the Find and Replace option.
– Click the Replace tab.
– Click the More >> option and select the following parameters:
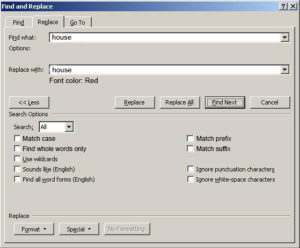
> checkbox shows two panels: Find options, with a range of options that allow us to refine the search, and Replace, which provides an easy way of changing the text format and using character expressions that cannot be manually entered (as line breaks, carriage returns, tabulations, etc.)” width=”500″ height=”448″>
The More >> checkbox shows two panels: Search options, with a range of options that allow us to refine the search, and Replace, which provides an easy way of changing the text format and using character expressions that cannot be manually entered (as line breaks, carriage returns, tabulations, etc.)As you can see, we are searching for ‘house’ in the whole document, in order to replace it for ‘house’, formatted in red. As this is a simple search, we do not need any of the extra options that Word offers; however, we do need to check that the string replacing the source one has the Font color: defined as Red. This can be checked in the Format > Font option.
The Format menu includes (as its name indicates) all the text format change options that allow more specific searches when replacing text.
So far, everything was very easy, wasn’t it? The beginning is quite basic but, what happens if the thing gets a little trickier? Let’s see the second case:
Same file and same customer, but he now wants the strings enclosed in quotes to appear in italics. At a first glance, we have a problem: how can we indicate Word what each of the strings enclosed in quotes contains, so we can change it into italics? Easy: we only have to use the renowned wildcard characters.
Wildcards are variables that represent a range of alphanumeric characters. That is, these are formulas that allow Word to understand what we are searching for; they are variable characters, not specific strings. Check the examples below for a better understanding:
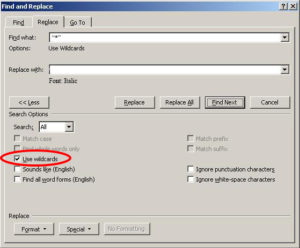
When selecting the Use wildcards checkbox, Word will assume that certain characters will be taken as variables. If we do not select this checkbox, Word will literally interpret what we wrote (if we wrote an asterisk, it will be searched as such).
As you can see in the Find what text box, we entered ‘*’. This search will find any text string which is enclosed in quotes. The asterisk acts as a variable and indicates the need to find any character string, regardless its size (as it is written in quotes, the engine will find any character string enclosed in quotes). It can include from a single letter to infinity. We have to think carefully where we want it to end searching, because if we don’t set any limit, it will interpret the whole text from the mark we set until the document end.
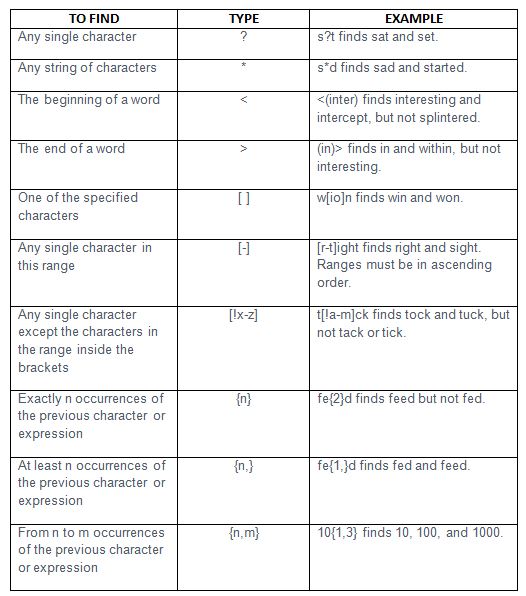
The asterisk is not the only wildcard we can use. Check below this table from the Word Help, which I find really useful for this tool. You can find below the different wildcards and their corresponding examples, showing how these can be used:
Apart from these codes, we will also need to know which is the expression to use when we want to search special characters, like line breaks, carriage returns, tabulations, graphics, section breaks, etc.
You do not need to learn a long list of programming formulas. In the Find and Replace window, we can also find the Special button. This button allows seeing all the expressions we could not normally write in the search box. As it happens with the wildcards, Word needs to use a special expression to identify these characters. Therefore, Word lists them in this way, making the access easier for us, so we do not have to memorize them all.
Well, I think this is enough to start playing around with this Word feature for a while, so I hope it is useful for you! Anyway, this is only a little sample of all you can do with this tool. I am only showing the basics, the rest is now in your hands.


Sin respuestas a "Searching in Word: a possible language"