


Emilio Lara, IT Dept.
WinAlign is included in the Trados software bundle and is used to align contents in files. For those uninitiated: aligning files consists in relating content segments from one file in the source language to the same file in its translated version, in order to create the corresponding entries for a translation memory. In this post I will explain, as shortly as I can, how to create a project in this software and how to align the matching segments.
Creating a new project
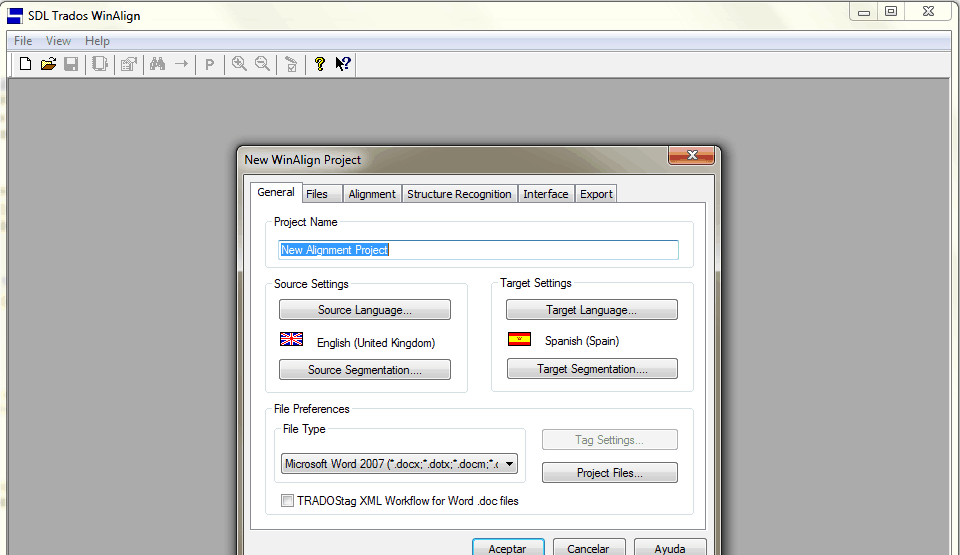
Click on File > New Project to open the wizard that will assist you in creating the project.
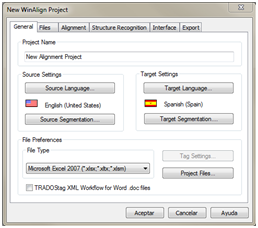
In the General tab, you can name the project, by selecting the source and target language and the file type we are working with (if we work with.doc files, you should check the TRADOStag XML Workflow for Word .doc files box).
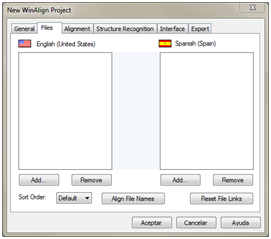
In Files tab, add the files to be aligned. In order to make a quick and easy alignment, you should take a few things into account. Firstly, the source and target files should keep the same structure, so WinAlign can match the segments automatically in a more effective manner. Secondly, the file name should be the same in both versions (or as similar as possible). In this way, when every file is located in its place, you will only have to click Align File Names. If not, every file should be joined with its corresponding translated version. Thirdly, the file type must match the type specified in the General tab.
Important: I do REALLY RECOMMEND the files to be aligned have the same name, the same structure and the same type; if not, WinAlign may show some issues when creating the alignment. The more work the tool does in its own, the less work we will have to do.
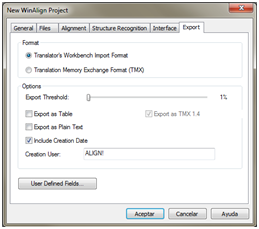
In the Export tab you can set the export file options once the files are aligned. The most important item in this section is the Format option. Through this option, we can decide the format the aligned segments will be exported in. We will usually choose the .tmx option, as this is the export format most commonly supported in the CAT tools.
You do not have to set anything in the rest of tabs. However, I describe below the use of every one of them:
– Alignment: You can set the segment alignment options here (format, tags, numbers, etc.) and, also, you can add a term list.
– Structure Recognition: These are the options for the structure recognition, this is: styles, fonts, paragraph numbering, etc.
– Interface: You can select here which are the options to work with when aligning.
When everything is properly set, click OK and (if everything worked fine) WinAlign will start processing the files and aligning automatically.
Working with WinAlign
The alignment process is really simple: you only have to match the source segments with the target segments. Even if the software usually does it automatically, it does not get to match the segments correctly some times, so we have to do it one by one. To achieve this, we have a few options to make it quicker.
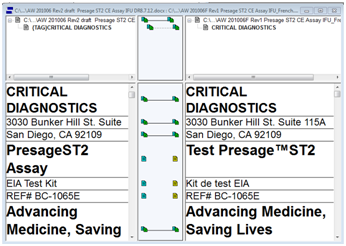
This is the window we work in. On the left you can find the source file segments and, on the right, the target file segments. Alignment is really simple: you only have to use the lines and match the left segments with the right ones, so both versions match seamlessly, source and translation versions. Icons appearing next to the segments are the following:
![]()
![]()
![]()
When opening an alignment for the first time, WinAlign automatically aligns the segments and matches them with a dotted line (![]()
![]()


During the alignment process, it can happen that the alignment structure can be wrong at some point (and, as a consequence, until the end of the document), so we will be forced to redefine it by manually connecting some sentences. To do so, we will have to accept all the connections reviewed until that moment right-clicking over the last reviewed segment and clicking Commit>Up to Active Unit. All the connections established by the program and reviewed by us until the active segment will be then automatically accepted. Apart from accepting all the already reviewed segments, we will have to delete all the connections from that active segment until the end of the document, so we will have to right-click over the last confirmed segment and use the option Disconnect>All Non-Committed Units. This way, we delete all the provisional connections from the current segment until the end of the document.
After manually fixing the desired connections, we can re-align the rest of the segments automatically. We just have to use the option Realign Structure Level from Active Unit>Standard Connections. This will create a new automatic alignment, ignoring the already accepted connections.
Once we have finished the alignment and all connections have been accepted, we just have to export the whole project (or document by document) to a .tmx file that we will be able to import into a Translation Memory to work with. We go to the project main window, right-click over the files we want to export and select Export File Pair(s)…
In general terms, these are the most important aspects of the alignment process with WinAlign. As a final reminder, bear in mind this program can sometimes be unstable and it hangs or crashes during some processes, so my recommendation would be to save your project and work every certain time, so that you do not get too much angry if it really crashes and you have to repeat part of the task.
I hope this explanation is useful for those of you unfamiliar with the program, and that you can really take advantage of it when leveraging material from previous translations.
¡¡Merry Christmas!!